


How to Dermaplane at Home? 101 Guide to DIY Dermaplaning

One of the ways to remove unwanted facial hair is dermaplaning as mentioned in How to Get Rid of Peach Fuzz Hair on the Face? (13 Ways). It is important to note that dermaplaning is a professional procedure that not only removes the excess hair from the face but also exfoliates the skin.
However, dermaplaning at a salon might raise concerns about the hygiene of the scalpels used for dermaplane and the convenience of visiting a salon too often. Therefore, do you want to learn “how to dermaplane at home”? If yes, stay with us.
Let us talk about how to dermaplane at home without breaking out.
Dermaplaning at home can be a great way to achieve smoother skin and remove dead skin cells, but it's important to do it safely to avoid breakouts.
Table of Contents:
- Part 1: What is Dermaplaning?
- Part 2: Can You Dermaplane at Home?
- Part 3: How to Prepare for Dermaplaning at Home?
- Part 4: Step-by-Step Guide to Dermaplaning at Home with a Razor
- Part 5: How Often to Dermaplane at Home?
- Part 6: Tips for Dermaplane at Home
Part 1: What is Dermaplaning?

Dermaplaing is a professional non-invasive procedure in which the dermaplaning expert, dermatologist, or skin surgeon removes the uppermost layer of the skin with the help of a scalpel and other dermaplaning tools.
Dermaplaning is a technique that not only enhances skin appearance but also prepares it for better absorption of skincare products.
This procedure also involves the removal of unwanted hair and peach fuzz from the face. Although it seems just like shaving, dermaplaning also involves skin exfoliation.
By removing peach fuzz and dead skin cells, dermaplaning helps in achieving a smoother makeup application.
Moreover, some of the benefits of dermaplaning are as follows,
The benefits listed below highlight how dermaplaning can be an effective part of a skincare routine.
- Exfoliates the skin deeply
- Lightens areas of hyperpigmentation and acne marks
- Makes skin smooth and glowy
- Makes skin look bright and younger
- Enhance the formation of new skin cells
Deep exfoliation can lead to a healthier skin texture and may help in reducing the appearance of fine lines.
This process may contribute to an overall more even skin tone, making it a popular choice for those with uneven pigmentation.
Many people find that this treatment leaves their skin feeling silky smooth and radiant, enhancing their natural glow.
With regular treatments, dermaplaning may assist in maintaining a youthful appearance by promoting cell turnover.
Enhancing the formation of new skin cells can lead to a more radiant and youthful complexion, making dermaplaning a popular choice for individuals seeking smoother skin.
As everything with pros have some cons as well. Here are the drawbacks of dermaplaning,
- It is a temporary procedure that requires frequent follow-ups
- It might cause breakouts in people with acne-prone skin
- It can lead to infection and peeling of the skin
- It is not suitable for people with psoriasis, eczema, and dermatitis
- You have to be careful to save yourself from cuts
Frequent follow-ups may be necessary to maintain results, as the effects of dermaplaning are not permanent and typically last a few weeks.
Breakouts can occur, particularly in those with sensitive or acne-prone skin, so it's essential to assess your skin type before proceeding.
Infection and peeling are potential risks associated with dermaplaning, especially if proper aftercare is not followed, highlighting the importance of hygiene.
Individuals with psoriasis, eczema, and dermatitis should avoid dermaplaning, as it may exacerbate their skin conditions and lead to irritation.
Taking precautions to avoid cuts is crucial during the procedure, as mishandling the blade can result in injuries that may require medical attention.
Part 2: Can You Dermaplane at Home?
We all have been Shaving our Faces for years, right? Well, dermaplaning is also a type of shaving with increased penetration of the blade into the skin to remove dead skin cells.
Dermaplaning is a popular technique that can enhance your skin's appearance by providing a smoother texture.
Therefore, it was only done at salons at first. But now, several at-home dermaplaning tools are available and women can dermaplane their faces at home. Dermplanning involves keeping the blade at 45 45-degree angles and moving it in small vibrating strokes to remove the peach fuzz and upper layer of the skin.
So, women can dermplane at home as long as they are skilled enough to take the game into their hands and have the right tools to help them through the process.
Having the right tools is crucial for safe and effective dermaplaning at home, so ensure you are well-equipped.
Additionally, preparation and post-care after dermaplaning is essential to optimize the results of dermaplaning at home.
Preparation and post-care are vital aspects that can significantly influence the effectiveness and safety of your dermaplaning experience.
Part 3: How to Prepare for Dermaplaning at Home?
Before getting into how to dermaplane at home with a scalpel or razor, let us learn how to prepare your skin for dermaplaning as it is equally essential as using the razor itself. So, here are the tips to prepare for dermaplaning.
- Prepare your Tools: Although dermaplaning can also be done with a regular shaving facial razor, we suggest you choose the tools that are specific for dermaplaning and not shaving as they provide better results and are safer to use. This could be an electric dermaplaning scalpel that vibrates as you move it across your face or a non-electric facial dermaplaning tool.
- Prepare your Skin: Once you have your tools, cleanse your face deeply. Go for double cleansing if you have any makeup or a single face wash if you are wearing no makeup. Anyhow, ensure that your face is free of excess oil, dirt, and other impurities.
-
Go to the Right Location to Dermaplane: The best place to dermaplane your face at home is in front of a brightly lit mirror. It will allow you to clearly see the movemen
Step-by-Step Guide to Dermaplaning at Home with a Razor
ts of the blade and its effects on your skin.
Part 4:
Let us make dermplaning at home easy for you with this 6-step guide on dermaplane with a razor.
Step 1: Choose Dry or Wet Dermaplaning

In-office dermaplaning is mostly done on clean and dry skin. However, you have an option of wet dermaplaning also called oilplaning at home. This type of dermaplaning works better for beginners and women with sensitive skin.
Choosing between dry and wet dermaplaning can significantly affect your experience and results, so consider your skin type before proceeding.
For the former, let your face air dry and for the latter, apply a facial oil on the skin.
Step 2: Grab Your Razor and Adjust its Angle
Take your electric or non-electric facial razor, rinse it with warm water, and keep it at an angle of 45 on the face. Also, hold it in a way that it is touching the face gently in the direction of hair growth.
Step 3: Start Dermaplaning
Hold the blade in your dominant hand and pull the skin tight with the opposite hand. Now, start moving the blade in short, downward, gentle, and feathery strokes over the skin.
Maintaining a tight skin surface is crucial for achieving the best results and minimizing the risk of cuts during dermaplaning.
Start from one side of the face and move to the other until you see that your whole face is dermaplaned. Also, wash the dermaplaning blades once they accumulate dead skin cells and peach fuzz on them.
Regularly cleaning your blades not only enhances their effectiveness but also ensures a safe and hygienic dermaplaning process.
Step 4: Rinse Your Face
Rinse your face with cool water once you are done dermaplaning and no area of the skin is left behind. Do not use any harsh face wash or soap; washing with cool water is enough.
Cool water helps to soothe the skin after dermaplaning, reducing any potential irritation from the procedure.
Step 5: Moisturize the Face
Complete the dermaplaning procedure with moisturization of your face. Also, use sunblock if your dermaplane in the morning.
Moisturizing effectively post-dermaplaning can help replenish the skin's hydration and promote a healthy, glowing appearance.
Step 6: Sterilise and Store the Blade
Wash your dermaplaning blade with soap water, let it dry, and store it in a cool place. On the other hand, you can use disposable blades.
Proper blade storage is essential for maintaining hygiene and prolonging the usability of your dermaplaning tools.
Part 5: How Often to Dermaplane at Home?
The frequency of dermaplaning at home mainly depends upon the barrier of your skin, product build-up in the skin, the amount of dead skin cells, and the rate of hair regrowth. For example, if your skin barrier repairs quickly and you have fast hair regrowth on the face, you can derm-plane once every week.
On the other hand, if you have fine hair regrowth and your skin takes time to heal, dermaplaning once a month is enough for you. Therefore, the ideal frequency of dermaplaning at home is anywhere between 1 to 4 weeks.
Part 6: Tips for Dermaplane at Home

Just like Hair Removal: Dos and Don’ts for Women Shaving Face, here are some tips for dermaplaning at home.
- Always buy a high-quality tool for dermaplaning at home so that you meet no accidents
- Keep the skin taut throughout the process as lax skin is prone to cuts
- Do not move the blade more than twice or thrice over an area
- Always dermaplane in a well-lit place
- Do not use makeup, active skincare products, or any harsh facial treatment immediately after dermaplaning
- Avoid chemical peels and retinoids for 2 days after dermaplaning
- Never forget to wear sunscreen, especially if you dermaplane in the morning
- Use skin-nourishing products to heal the barrier of the skin
- Contact a specialist if you face any mishaps during the process
Investing in a high-quality tool can help ensure a safer and more effective dermaplaning experience, reducing the risk of injuries.
Keeping the skin taut helps to create a smooth surface, making it easier to remove dead skin cells and peach fuzz safely.
Limiting the number of passes over the same area helps prevent irritation and minimizes the risk of nicks or cuts.
Good lighting allows for better visibility, which is crucial for precise dermaplaning and avoiding accidents.
Post-dermaplaning care is essential to protect the freshly exfoliated skin from potential irritants and maintain its health.
Avoiding chemical peels and retinoids post-dermaplaning helps prevent excessive irritation and allows the skin to recover properly.
Sunscreen is vital after dermaplaning to safeguard your skin from UV exposure, especially when the skin is more sensitive.
Skin-nourishing products can help restore the skin's moisture and promote healing after dermaplaning, ensuring a healthy and vibrant complexion.
If you encounter any issues, such as irritation or cuts, seeking help from a specialist can provide you with the necessary care to address these concerns safely.
Conclusion
Dermaplaning at home is not as difficult as it might seem as long as you can master the correct technique to dermaplane and use the tools specified for dermaplaning.
Therefore, we have explained the step-by-step guide to dermaplane at home in this article. You can follow these steps and shave your face like a pro at home.
Additionally, set a suitable schedule for dermaplaning and do not overdo it as it might compromise your skin’s barrier.
Finding the right balance in your dermaplaning schedule is essential, as too frequent treatments can lead to sensitivity and skin damage.
Featured Products

Ulike Air 10
2 weeks to silky smooth skin.
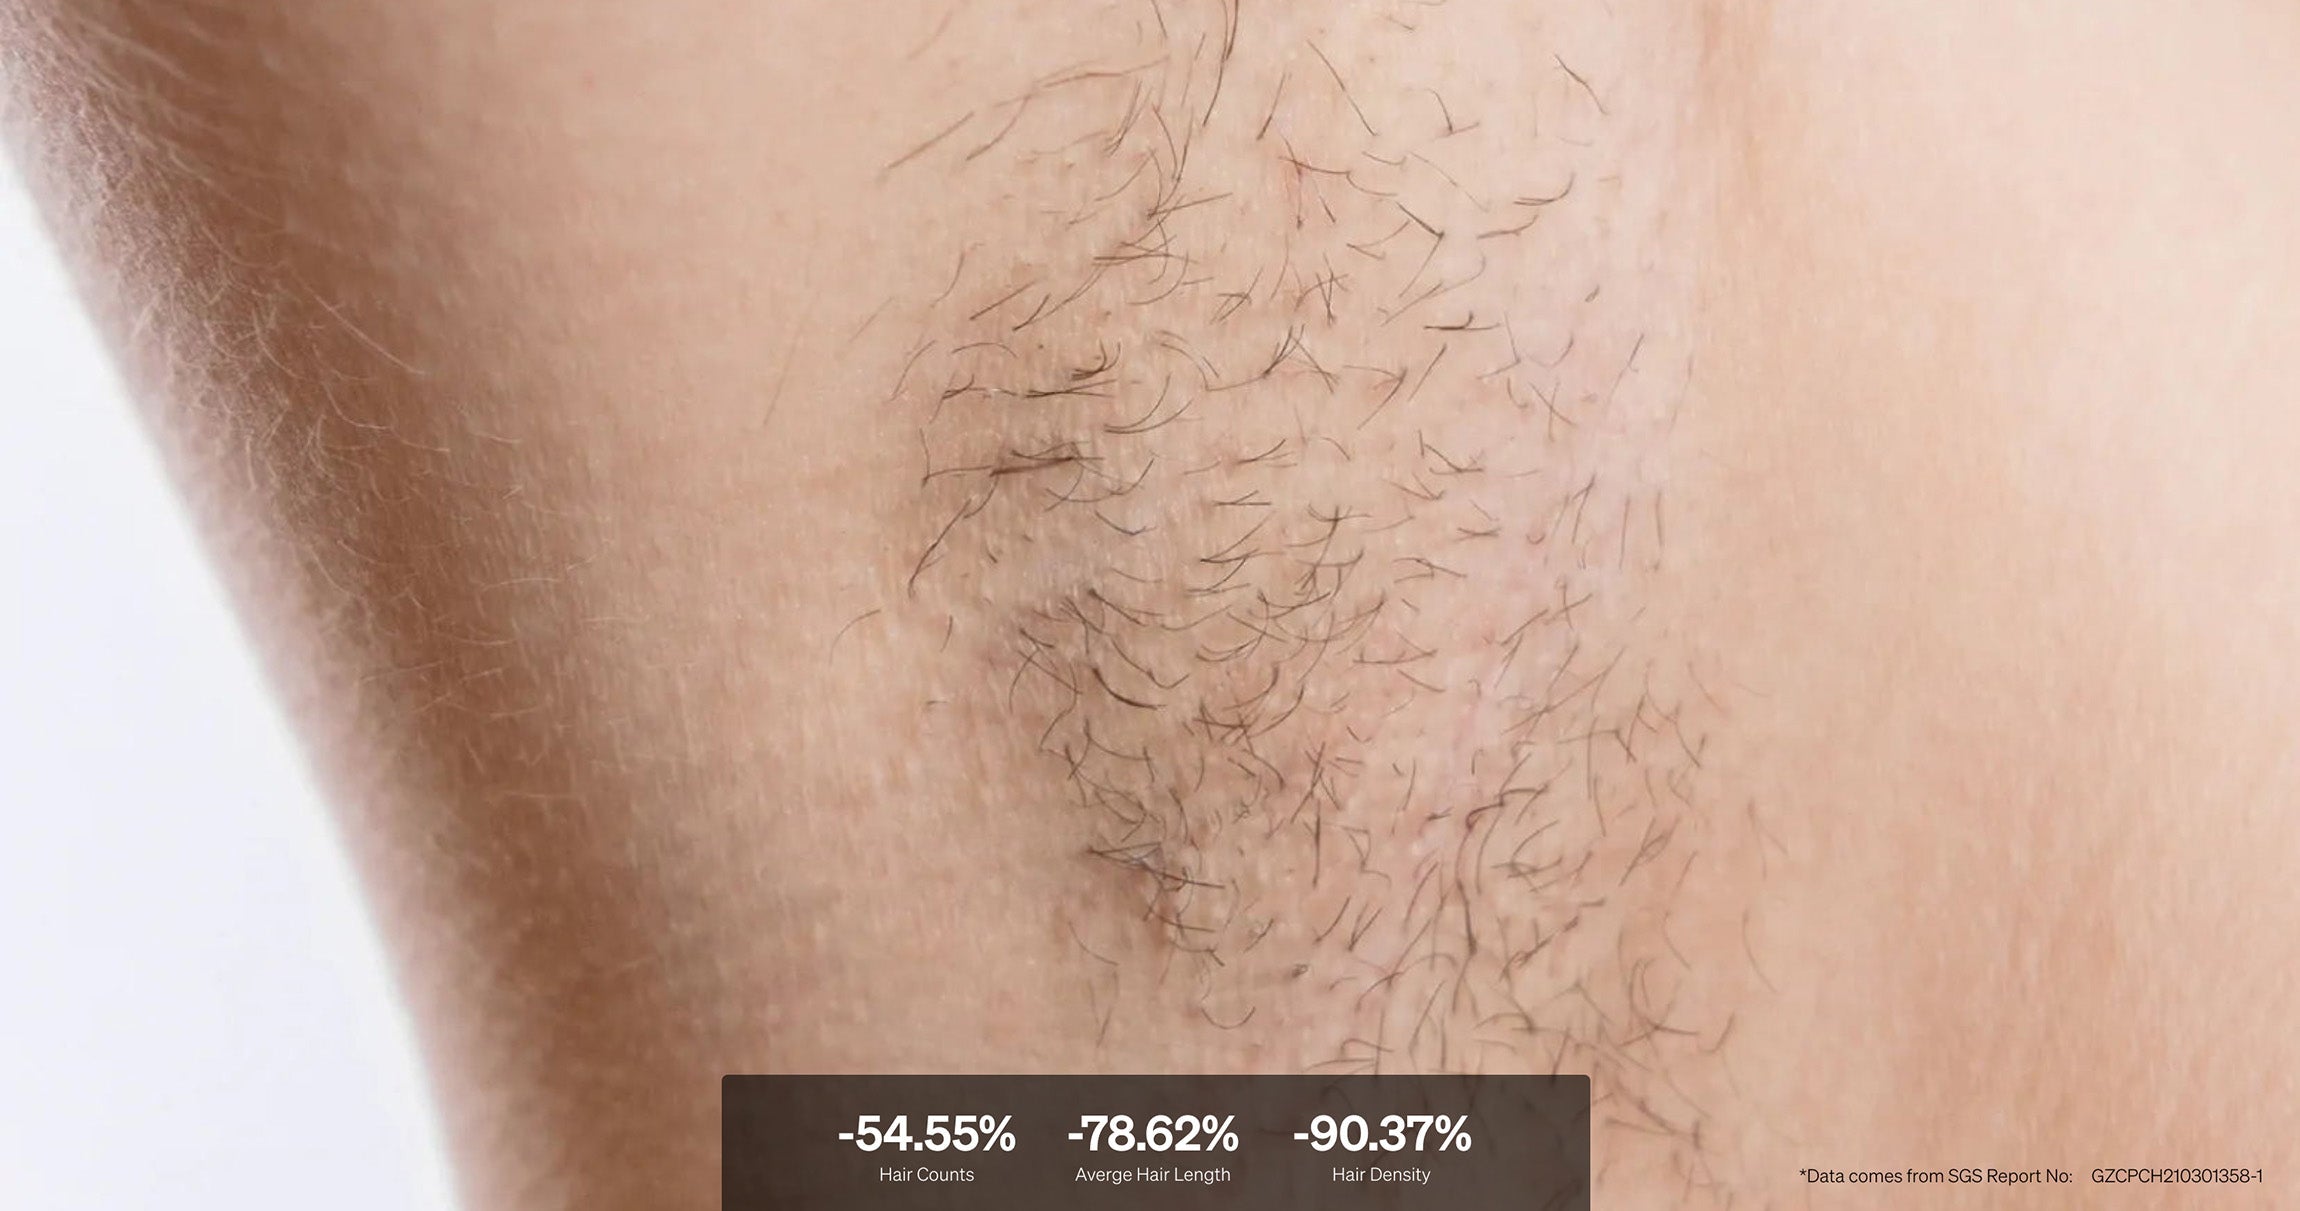
96% Hair Density Reduction
The next-generation in simple,
lasting hair removal.

10 Female Celebrities with Sideburns Who Embrace Their Natural Beauty

Prada vs. Louis Vuitton: Which One Should You Choose?
18 Special Memorial Day Weekend Activities for Family in 2025

Explore Beauty
Ulike Air 10
2 weeks to silky smooth skin.
96% Hair Density Reduction in 2 Weeks
Ulike Air 3
3 weeks to silky smooth skin.
93% Hair Density Reduction in 4 Weeks
Ulike Air 4
4 weeks to silky smooth skin.
95.8% hair reduction in just 2 weeks*
Ulike Reglow
Clearer skin in 2 weeks: Fewer breakouts
Smoother skin in 4 weeks: Fewer lines, firmer feel